
Bring your venue data into ChatGPT.
Connect SmartSegments, check that ChatGPT can see the right projects, then ask clearer questions about bookings, revenue and guests.
First, choose the right workspace
Before you connect
Open ChatGPT in a web browser and check the active workspace in your profile menu. Your plan and workspace determine which setup to follow.
- Pro: select your personal workspace. Check Settings > My Plan or Settings > Billing.
- Business: select your organisation workspace. An owner or admin can confirm the plan under Workspace settings > Billing; members can ask their admin.
- If you have both plans, follow the instructions for the workspace you will use.
Have the Google account authorised for your SmartSegments data ready. For ROLLER, that account needs access to the relevant Google Cloud project.
01 / Personal workspace
Set up ChatGPT Pro
Open Plugins and add a connection
Open Plugins in the sidebar, then choose + > Add custom MCP server. Some interfaces show this under Settings > Plugins > Browse plugins.
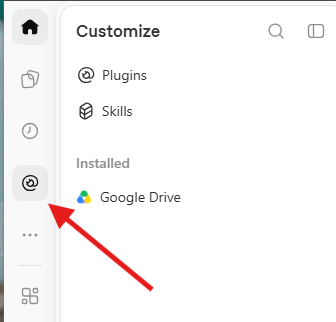
Select Plugins in the ChatGPT sidebar. Enter the SmartSegments details
Use these values. Do not alter advanced OAuth settings unless SmartSegments tells you to.
- Name
- SmartSegments
- Server URL
- https://mcp.smartsegments.ai/
- Authentication
- OAuth
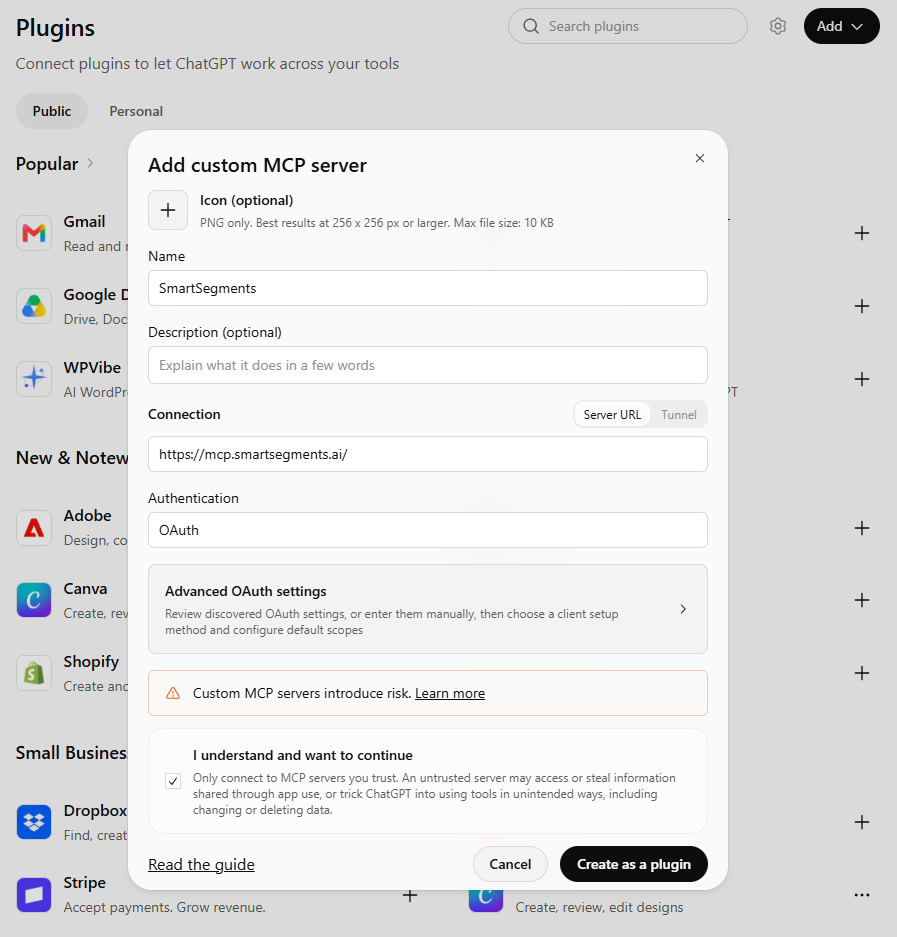
Add the SmartSegments server details in ChatGPT. Create and install the plugin
Review and accept the notices and choose Create as a plugin. Open Plugins > Personal > SmartSegments, then select Install plugin or +.Connect your Google account
Sign in with your authorised Google account when prompted and review the permissions. Sign-in may appear during setup or on first use. Then continue to test your connection.
02 / Organisation workspace
Set up ChatGPT Business
An owner or admin creates and publishes the SmartSegments app from the organisation workspace.
Open Workspace settings
Open the workspace menu at the bottom left of ChatGPT, then select Workspace settings.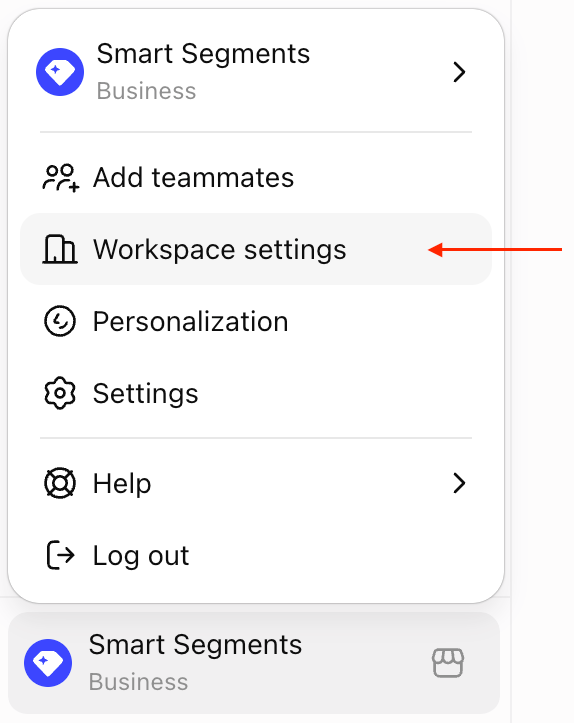
Open Workspace settings from the workspace menu. Open Apps and start creating the app
Select Apps in the left panel, then click + Create.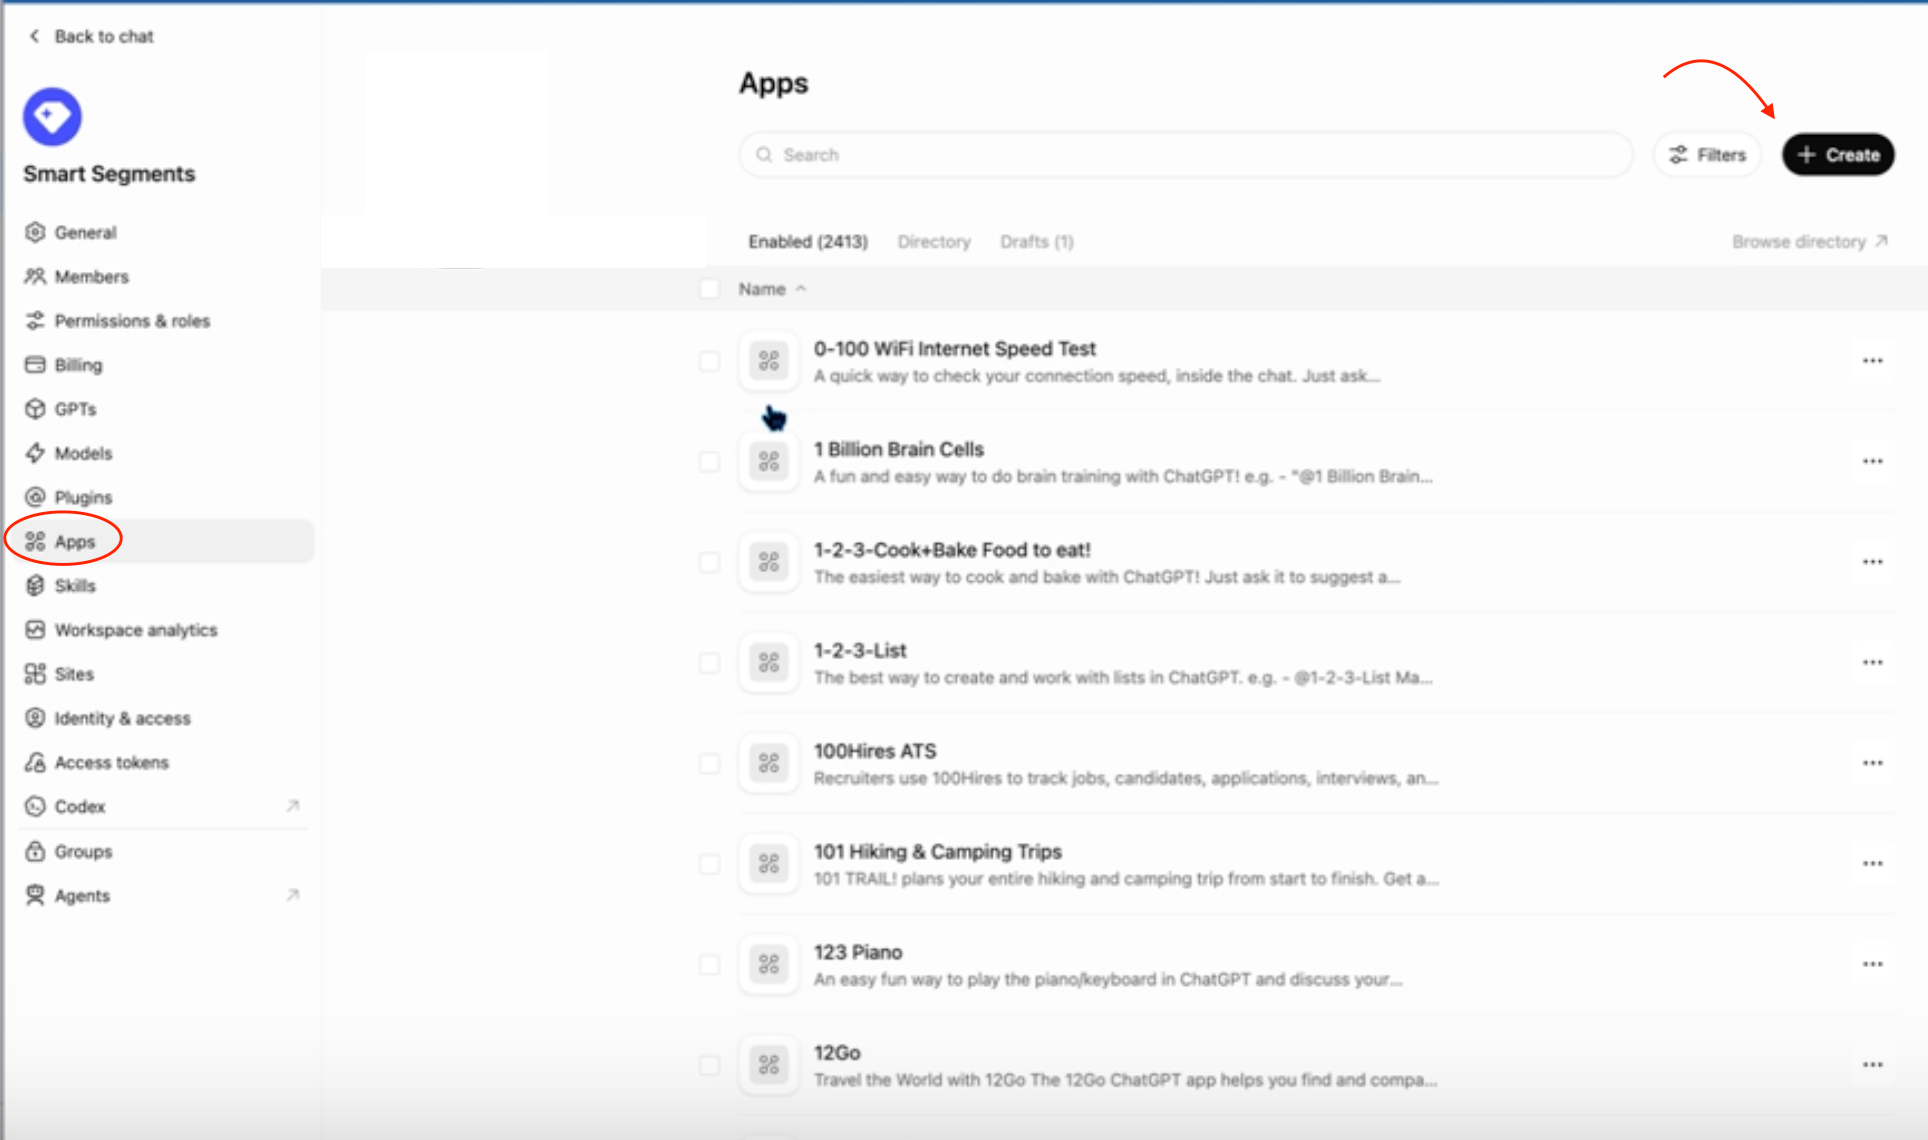
Open Apps, then choose + Create. Enter the SmartSegments connection details
Name the app MCP ROLLER Smart Segments. Set Connection to Server URL, use OAuth authentication, select the acknowledgement checkbox, then click Create.
- Name
- MCP ROLLER Smart Segments
- Server URL
- https://mcp.smartsegments.ai/
- Authentication
- OAuth
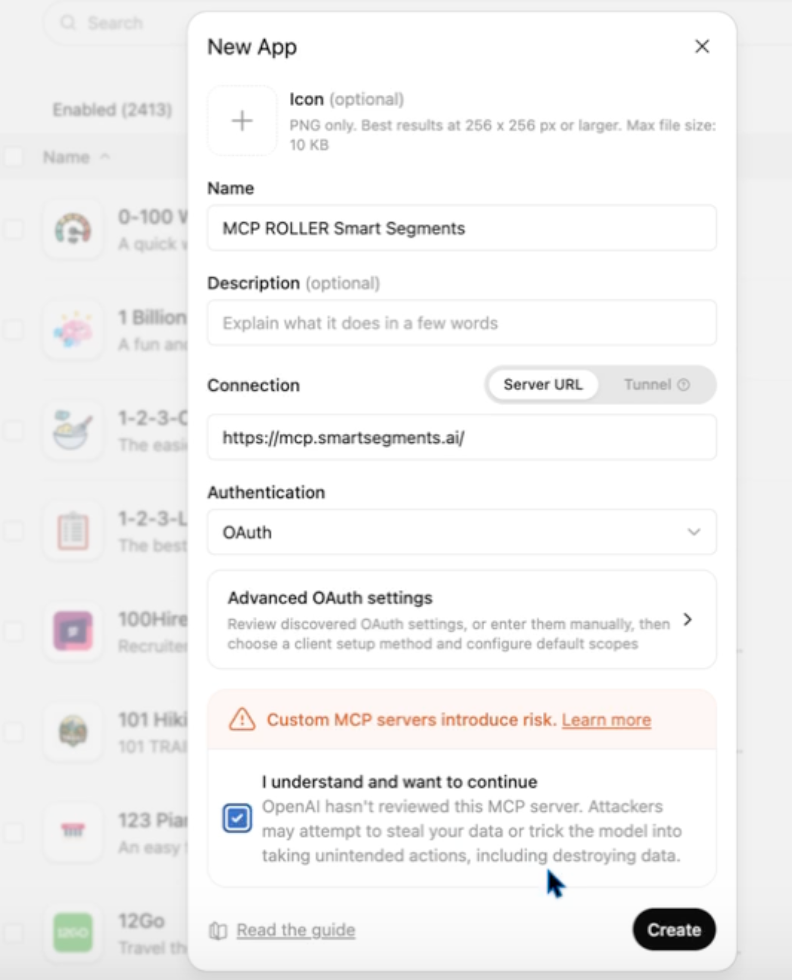
Enter the app name and MCP server URL, then acknowledge the notice and create the app. Find the app in Drafts
Wait for the app to appear in Drafts. Open the menu next to Publish, then choose View details.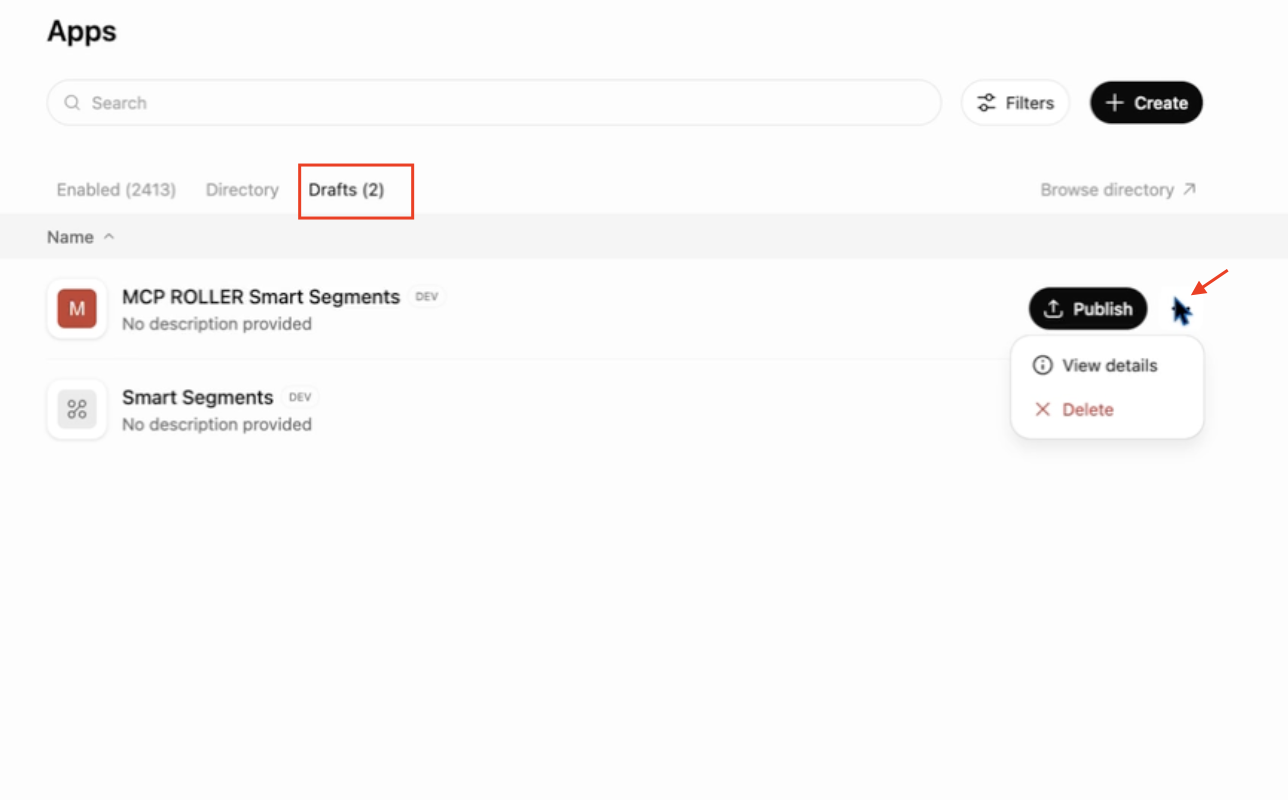
Open the new app's details from the Drafts tab. Enable and publish the app
Click Enable, review and accept the displayed review conditions, then select Publish. The supplied guide notes that ChatGPT verification was still in progress when it was written; follow the review conditions shown in your workspace.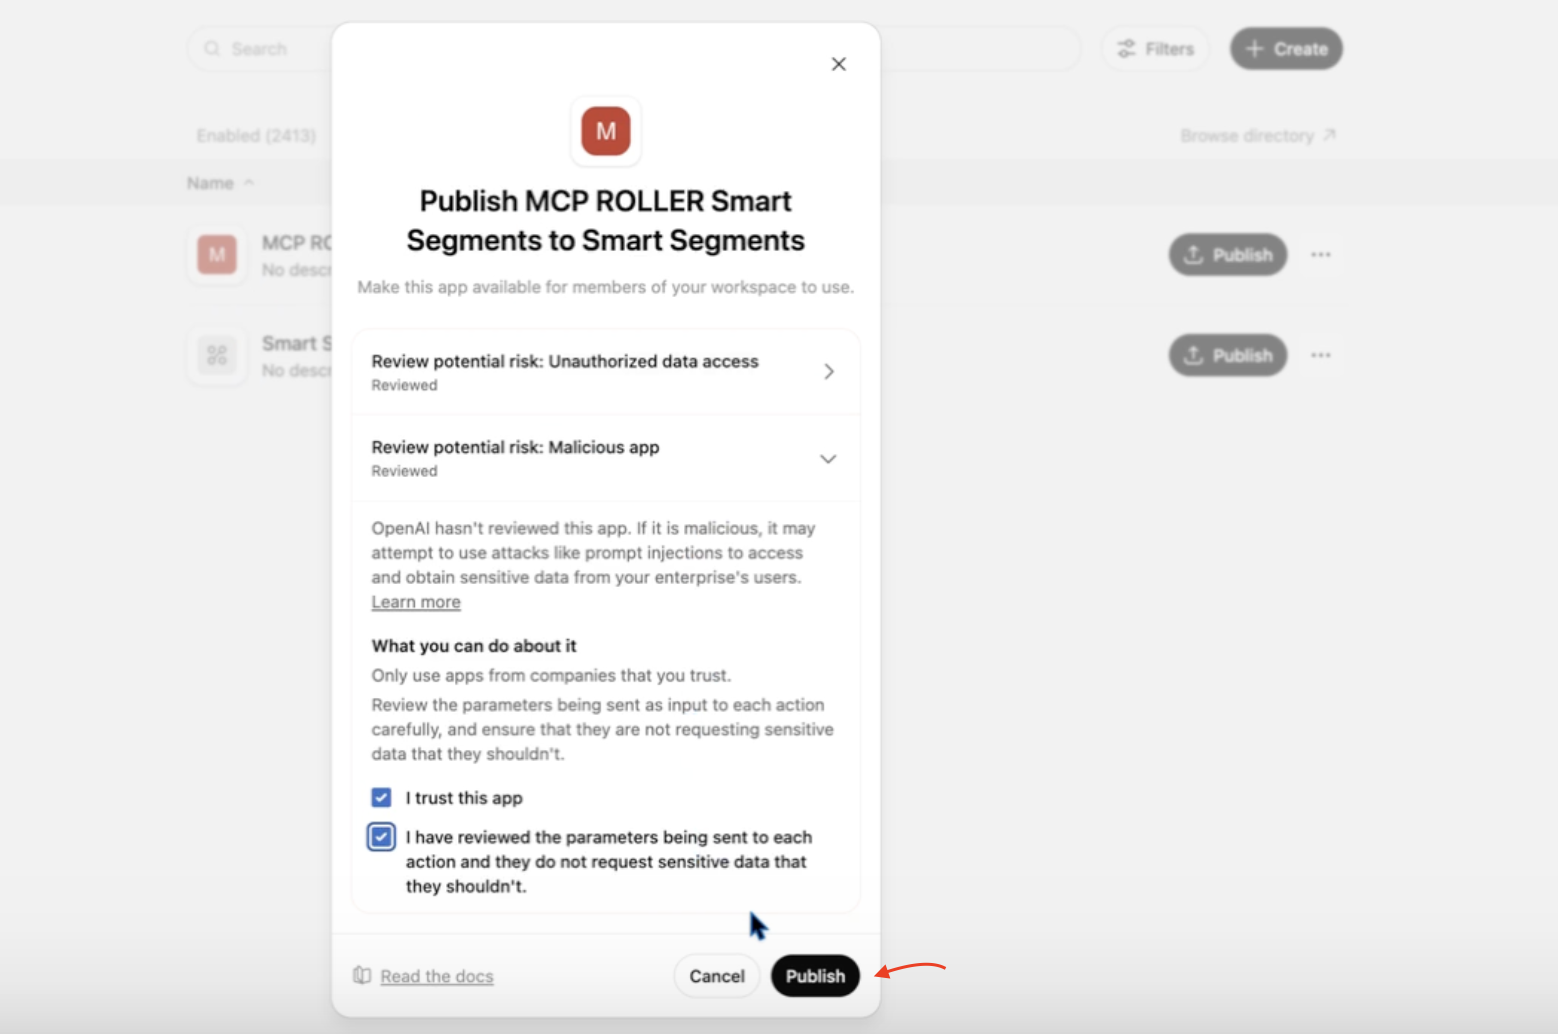
Review the conditions shown in ChatGPT, then publish the app. Complete Google sign-in
When prompted, authenticate with the Google account that has access to the Google Cloud Project used for SmartSegments.
Business workspace member
Add the published app to your workspace
Follow these steps if an owner or admin has already published MCP ROLLER Smart Segments to your ChatGPT Business workspace. You can add the shared app from your own account; you do not need to create or publish it again.
Open Settings from the workspace menu
Open the workspace menu at the bottom left of ChatGPT, then select Settings.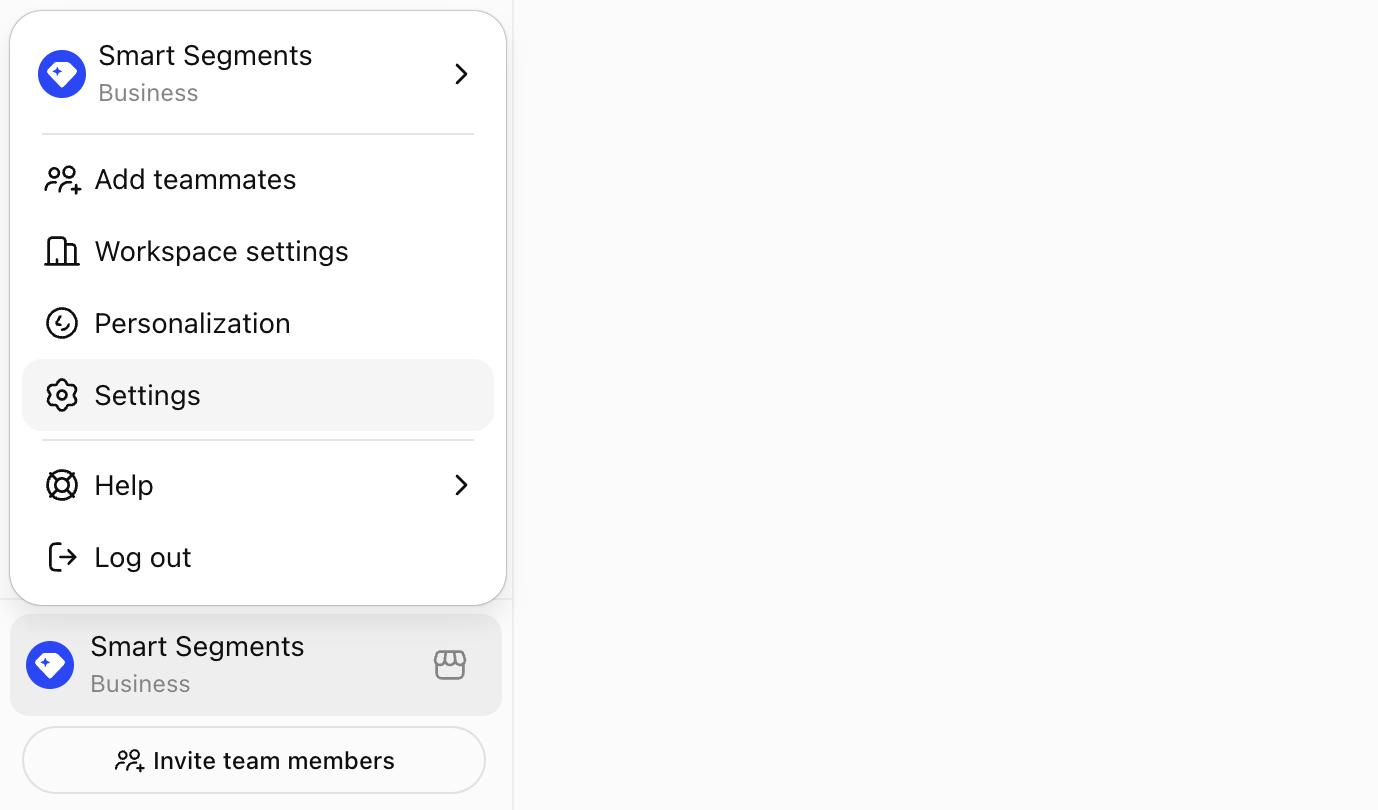
Open Settings from the workspace menu. Browse available plugins
Go to Plugins, then select Browse plugins.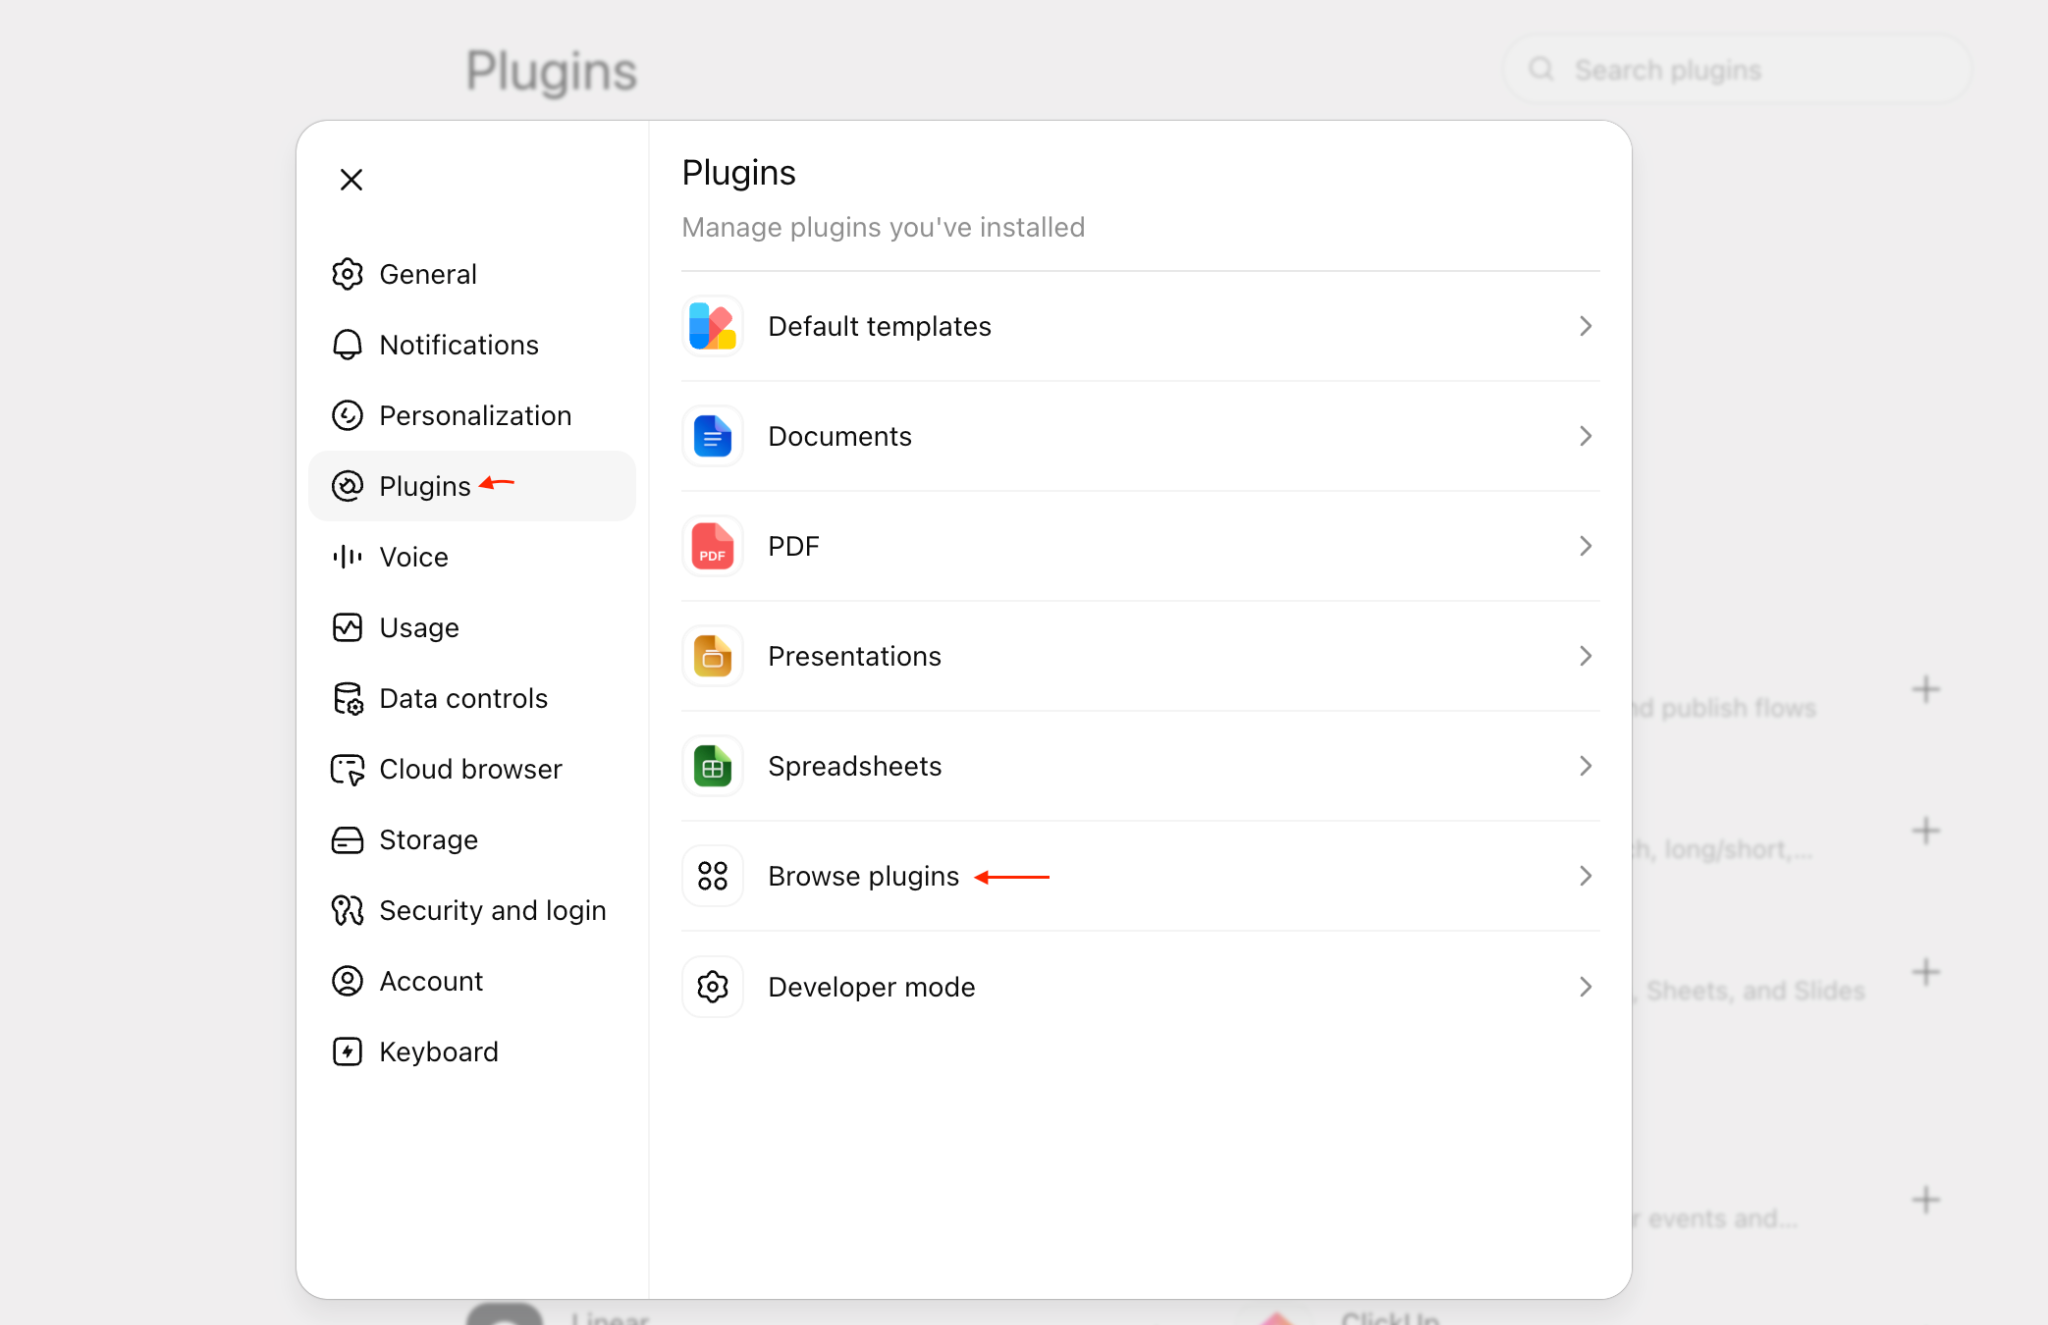
Open Browse plugins from Settings > Plugins. Open your organisation's SmartSegments apps
On the Plugins page, select the Smart Segments tab next to Public.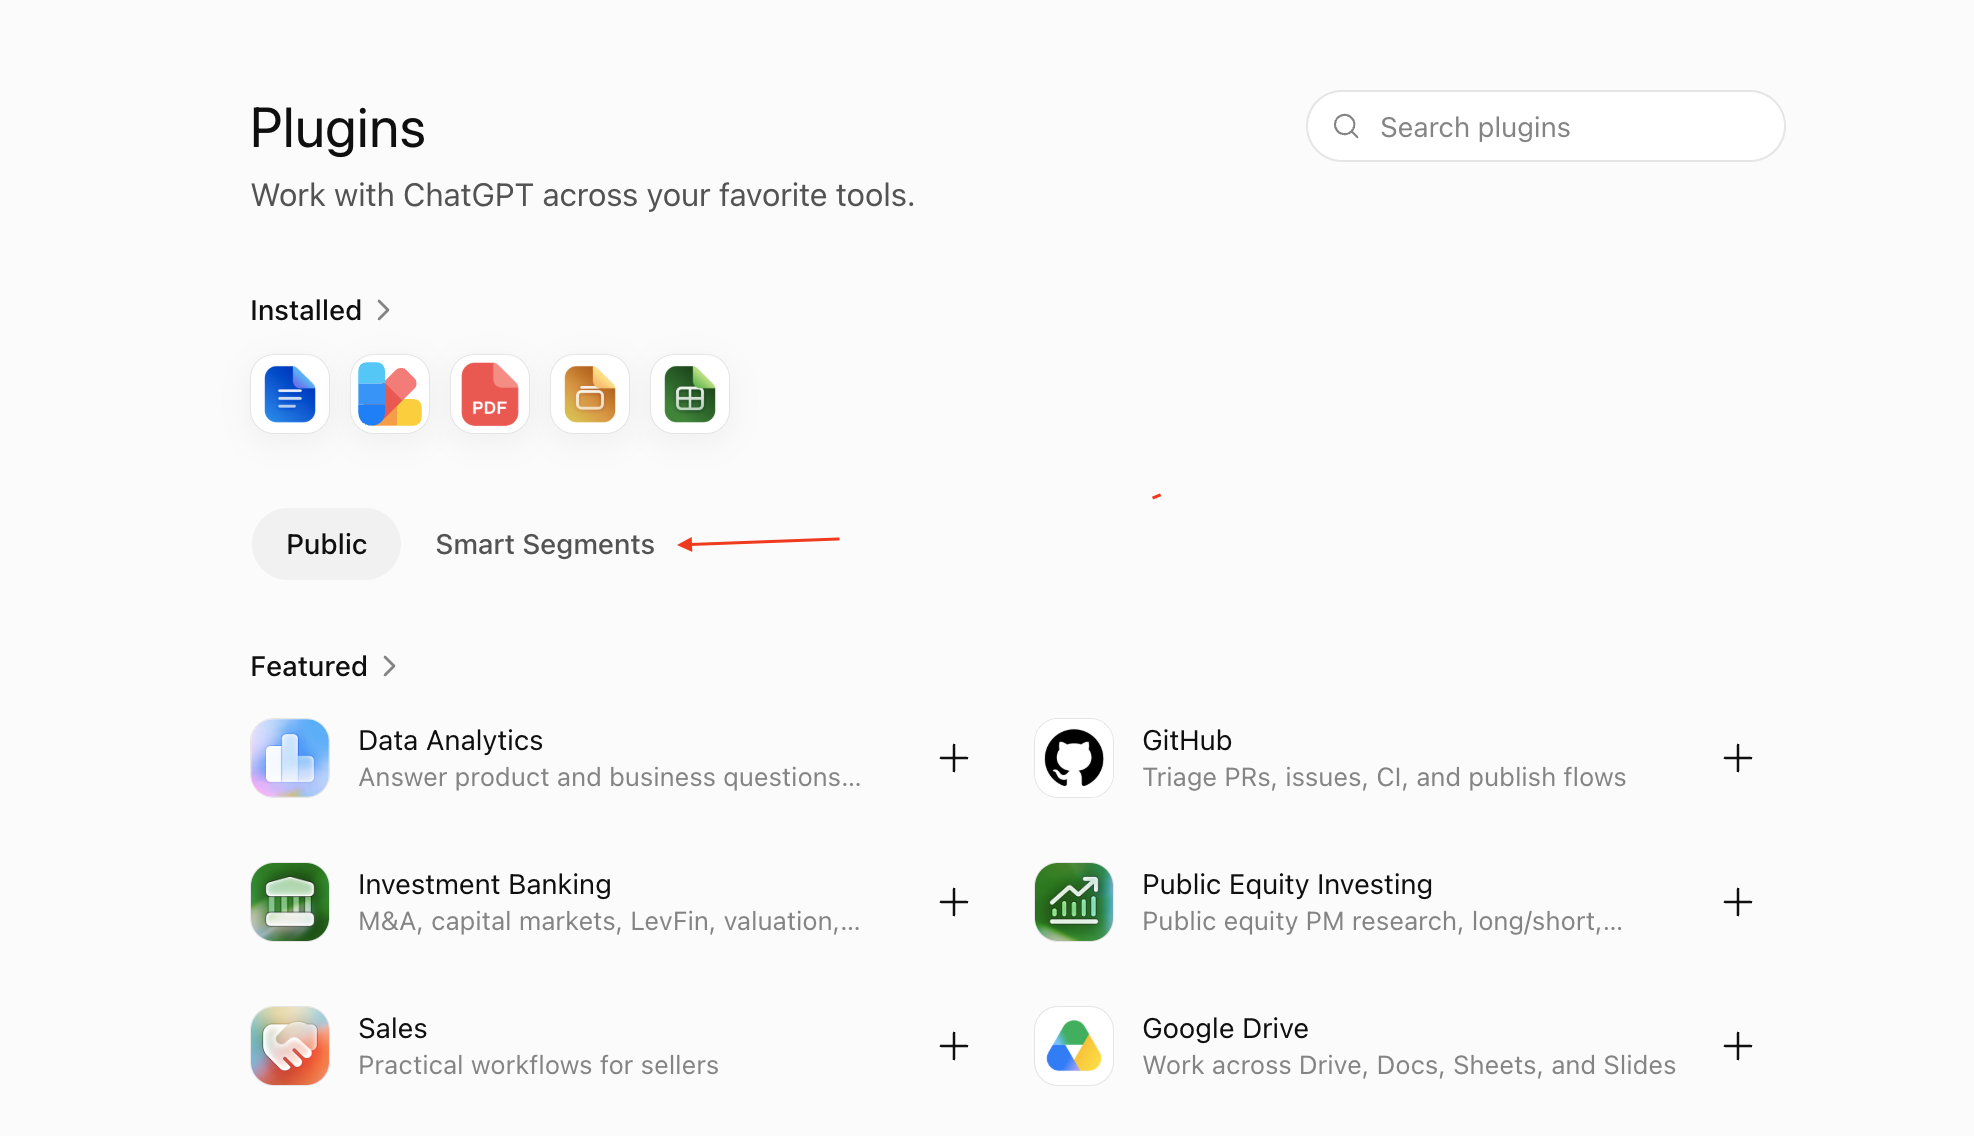
Select Smart Segments to view apps shared in your organisation workspace. Add MCP ROLLER Smart Segments
Find MCP ROLLER Smart Segments, then select the + button.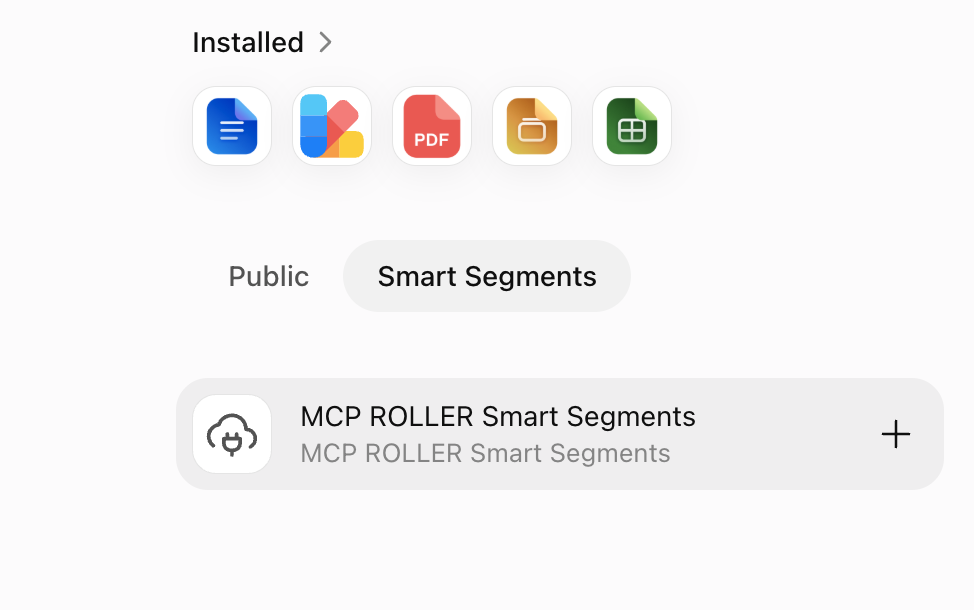
Add the app published by your workspace owner or admin. Connect your Google account
When prompted, authenticate with the Google account that has access to the Google Cloud Project used for SmartSegments. Then continue to test your connection.
03 / Test and use
Test your connection
Start a new chat. Choose Work if Chat and Work tabs appear. Select SmartSegments with @, then run this project-and-venue check before asking for business results.
Use SmartSegments to list the projects and ROLLER venues I can access. Show their names and IDs, then ask me which venue to analyse.
Success means you see the expected project and venue names. If nothing appears, use Get unstuck. If you already know your project ID, include it in the prompt.
Ask your first business question
Choose a venue. Replace text in square brackets with the name or ID returned above.
For [venue], compare bookings and revenue for the last full calendar month with the month before. Show totals, percentage changes and the main drivers.
For [venue], rank the top 10 products by revenue over the last 90 complete days. Include booking counts and each product's share of revenue.
For [venue], analyse party bookings and revenue over the last 90 complete days. Show average spend per party booking and the strongest packages, then suggest three ways to grow party revenue. Flag any missing data.
Make the numbers comparable
Add this instruction to your question:
“State the exact dates, timezone, currency, date basis, and how revenue, tax, refunds and cancellations are treated. Flag missing or incomplete data.”
For peak trading times, ask for visit date and session time rather than the time the booking was placed.
04 / More questions
Explore marketing and guest behaviour
Build on your first insights with GA4 and more detailed ROLLER questions. Available answers depend on the data and permissions in your connection.
See which marketing channels perform
GA4 availability depends on your authorised Google account and SmartSegments connection. First confirm which properties are available:
Use SmartSegments to list the Google Analytics 4 (GA4) properties I can access, including their names and property IDs.
For [GA4 property ID], compare sessions, key events and purchase revenue by session source/medium for the last full calendar month. Highlight the strongest channels and flag unavailable metrics.
Go deeper into venue performance
For [venue], break down visits and revenue by day of week and session start hour over the last 90 complete days. Identify peak and quiet periods. Use visit dates and session times where available, and explain how revenue is allocated.
For [venue], compare revenue share and average spend per booking for new and returning guests last quarter. Define returning guests and the history used to identify them. If customer history is insufficient, explain the limitation.
Use the project, venue and property IDs returned by SmartSegments when similar names appear. Ask ChatGPT to show the date range, definitions and missing data alongside each result.
05 / Help and reference
Get unstuck
Check your ChatGPT plan and active workspace first. Plugin access and Google data permissions are separate checks.
| What you see | What to do |
|---|---|
| SmartSegments is missing | Pro: check Plugins > Personal and install your plugin. Business: check Apps in the correct organisation workspace and confirm the app has been published. |
| Create or Publish is unavailable | Pro: use the Apps and Developer mode route above. Business: ask an owner or admin to complete the setup. |
| Google sign-in fails or uses the wrong account | Choose the Google account approved for your SmartSegments data. If a different account was connected, reconnect with the authorised one. If it persists, share the error message with your SmartSegments contact. |
| Connected, but no projects or venues appear | Confirm the Google email you used with your SmartSegments contact. Ask them to check your project permissions and whether your venue data is configured. |
| ChatGPT gives a generic answer | Start a new chat, select SmartSegments with @, and explicitly ask it to use SmartSegments. Run the project-and-venue check again. |
| GA4 properties or revenue are missing | Confirm that the connected Google account has access to the intended GA4 property and that GA4 is available through your SmartSegments connection. Ask for missing metrics to be identified, not estimated. |
| Totals differ from another report | Compare the same venue, currency, dates and timezone. Check booking date versus visit date, revenue definitions, taxes, refunds, cancellations and data freshness. |