A step-by-step guide to send booking purchase events to Facebook Conversions using the ROLLER webhooks – no coding needed!
Want to improve your ad targeting, decrease cost per action, and better measure results across Meta platforms using your ROLLER data? Since the iOS14 update that disrupted Facebook tracking on iOS devices, the Facebook Conversions API is essential for effectively targeting ads.
This guide will show you how to send booking purchase events from the ROLLER booking platform through to the Facebook Conversions API.
This means that whenever a new booking is made, an existing booking is updated, or if a booking is cancelled, all your purchase events will be synced with your Facebook ads account. This information will help Facebook optimise your ads and find better lookalike audiences, greatly increasing your return on advertising spend.
You’ll learn:
- How to create a webhook
- How to catch purchase events using the webhook and send them to Facebook conversions
- How to use the Postman app to create and manage the webhooks
- How to use the Zapier app to set up the webhook trigger to catch the bookings in real time from ROLLER, parse them into your specified format and send them to Facebook Conversions API
The best part? You don’t need to write any code.
What are webhooks?
Webhooks enable event-based one-way data sharing in real time (think: details of a new booking or a ticket redemption in the venue as it happens), and streaming data straight into a reporting dashboard, or to trigger other events.
If you want to get technical: When you set up a webhook between ROLLER and Facebook Conversions, every time an event occurs, ROLLER will send an HTTP request to the endpoint (Facebook) with the events payload you wish to receive.
The ROLLER webhook doesn’t have the same number of fields as the ROLLER data API (e.g. customer email, postcode). For a deeper integration, get in touch with us so we can help you get set up.
ROLLER currently provides three webhooks:
Bookings webhook: This webhook can be configured to provide real time updates on booking events, such as when a new booking is made, an existing booking is updated, or if a booking is cancelled.
Redemption webhook: This webhook provides real time updates on all redemption events. For example, whenever a venue pass gets scanned, you can have that information instantly.
Customer Webhook: This webhook shows when a new customer record is created, or when an existing customer record is updated (when a customer updates their details, or if they make another purchase).
Note: ROLLER webhooks has a limit on the number of API requests that can be posted. Additional charges might apply based on usage. Please contact ROLLER for more information on pricing and usage prior to setting up a webhook.
Tools you'll need
We use Postman to create and manage webhooks, and Zapier to receive the event payload and send the information to Facebook Conversions API.
The advantage of using Postman is that it’s a straightforward way to implement webhooks, and you don’t have to code anything because the Postman collection of all the API calls is on the ROLLER docs website.
You’ll also need to have access to Facebook Conversions and, of course, your ROLLER account.
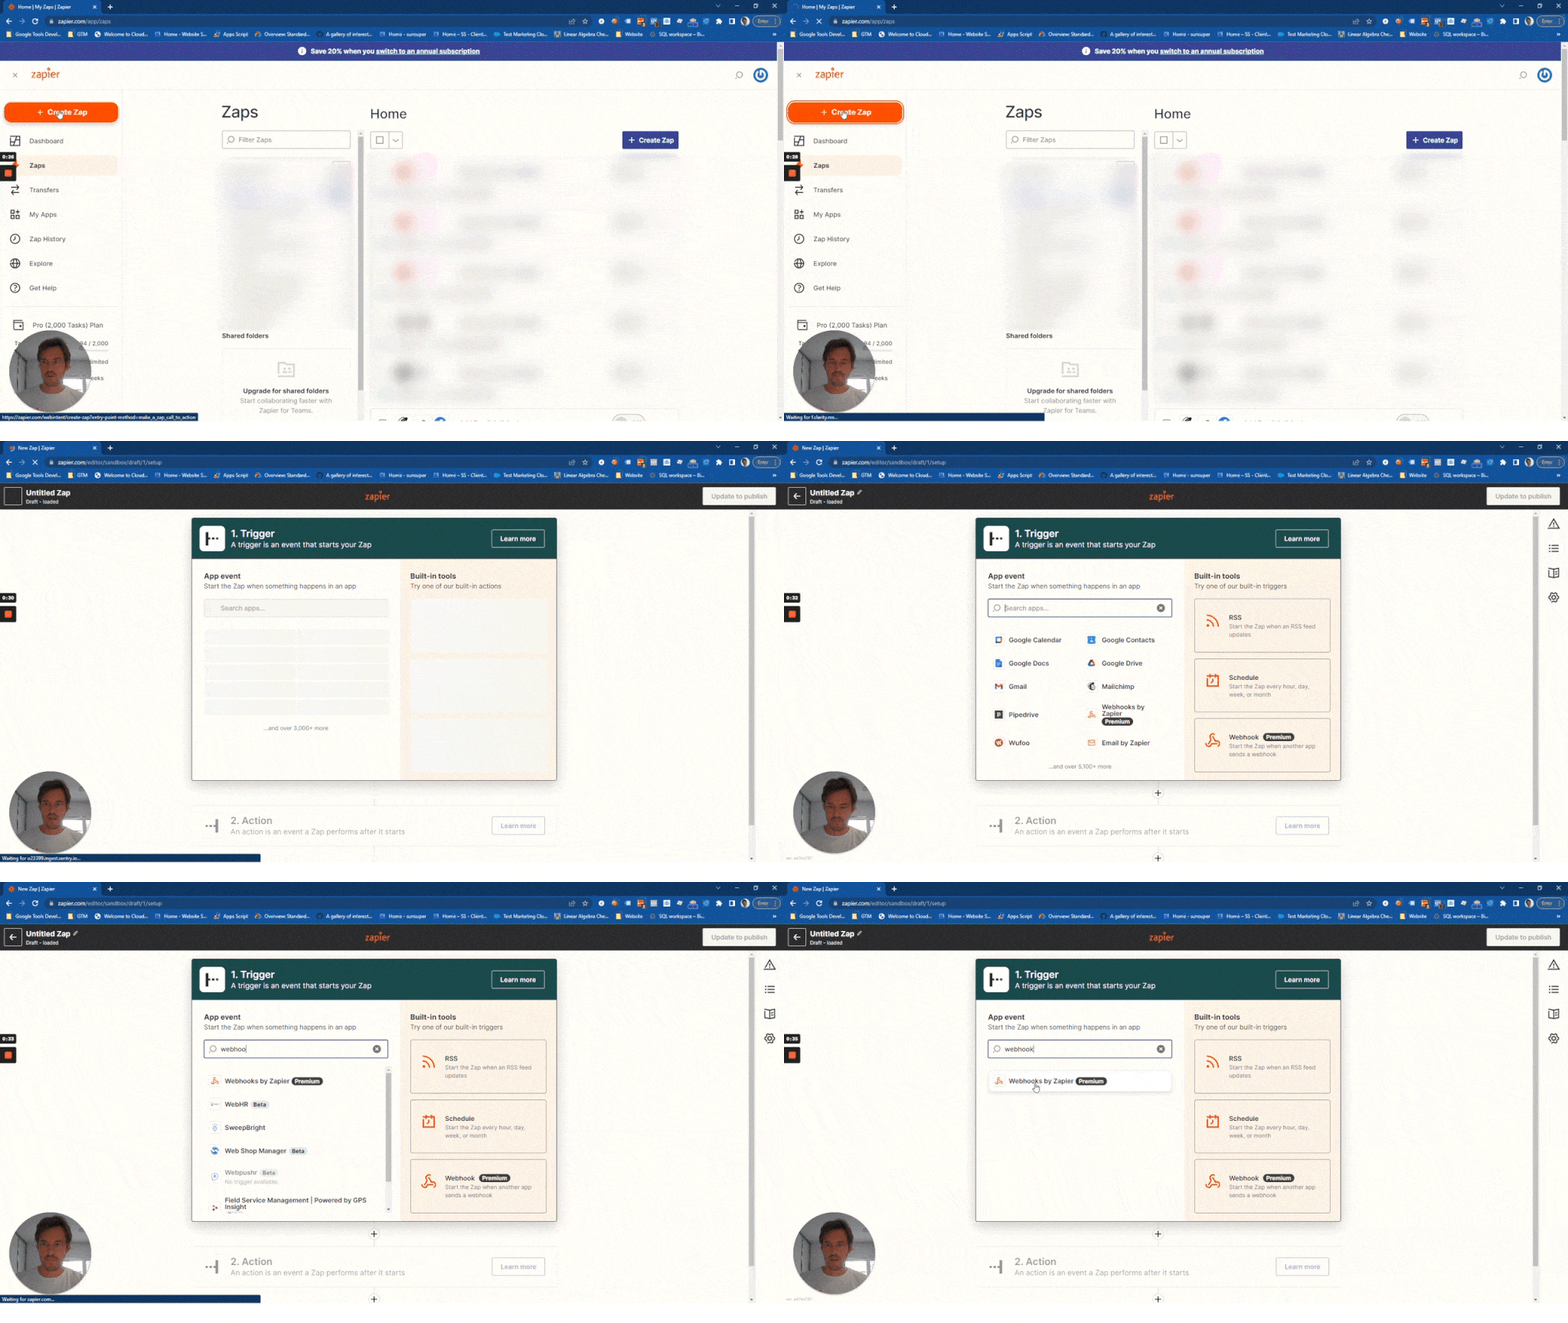
Step 1 : Create and manage a custom webhook URL in Zapier
- Within Zapier, create a new ZAP (automated workflow) and configure the trigger.
- From ‘Choose app & event’, select ‘Webhooks by Zapier’ and set the corresponding trigger event as ‘Catch Hook’. After configuring the trigger, you’ll receive a custom webhook URL, which can be used to create a webhook (save the URL as you’ll need it in the next step).
Step 2 : Setup Postman
- Download and open Postman on your browser
- Click ‘Collections’ > ‘Import a new collection’ > ‘Import via a link’
- Copy and paste this link to import ROLLER’s Postman collection:
https://www.getpostman.com/collections/5ca4d50917c5e7b75649 - To use the collection, first select the Postman Collection. Then click ‘Import’ and use the URL option to paste the above link and import the collection.
- In the ‘Variables’ tab, input your ROLLER API credentials into the ‘Current Value’ fields and, if needed, change the ‘Environment’ variable. If you need help finding your API key, visit our ROLLER Connector setup guide.
- Send the Auth Token by clicking into the auth token endpoint and pressing “Send” on the right. Then copy and paste it into the ‘Current Value’ field for the token variable, making sure to overwrite ‘Bearer xxxxxxxxx’. Don’t forget to save.
- The other API calls in the collection will also now use this token.
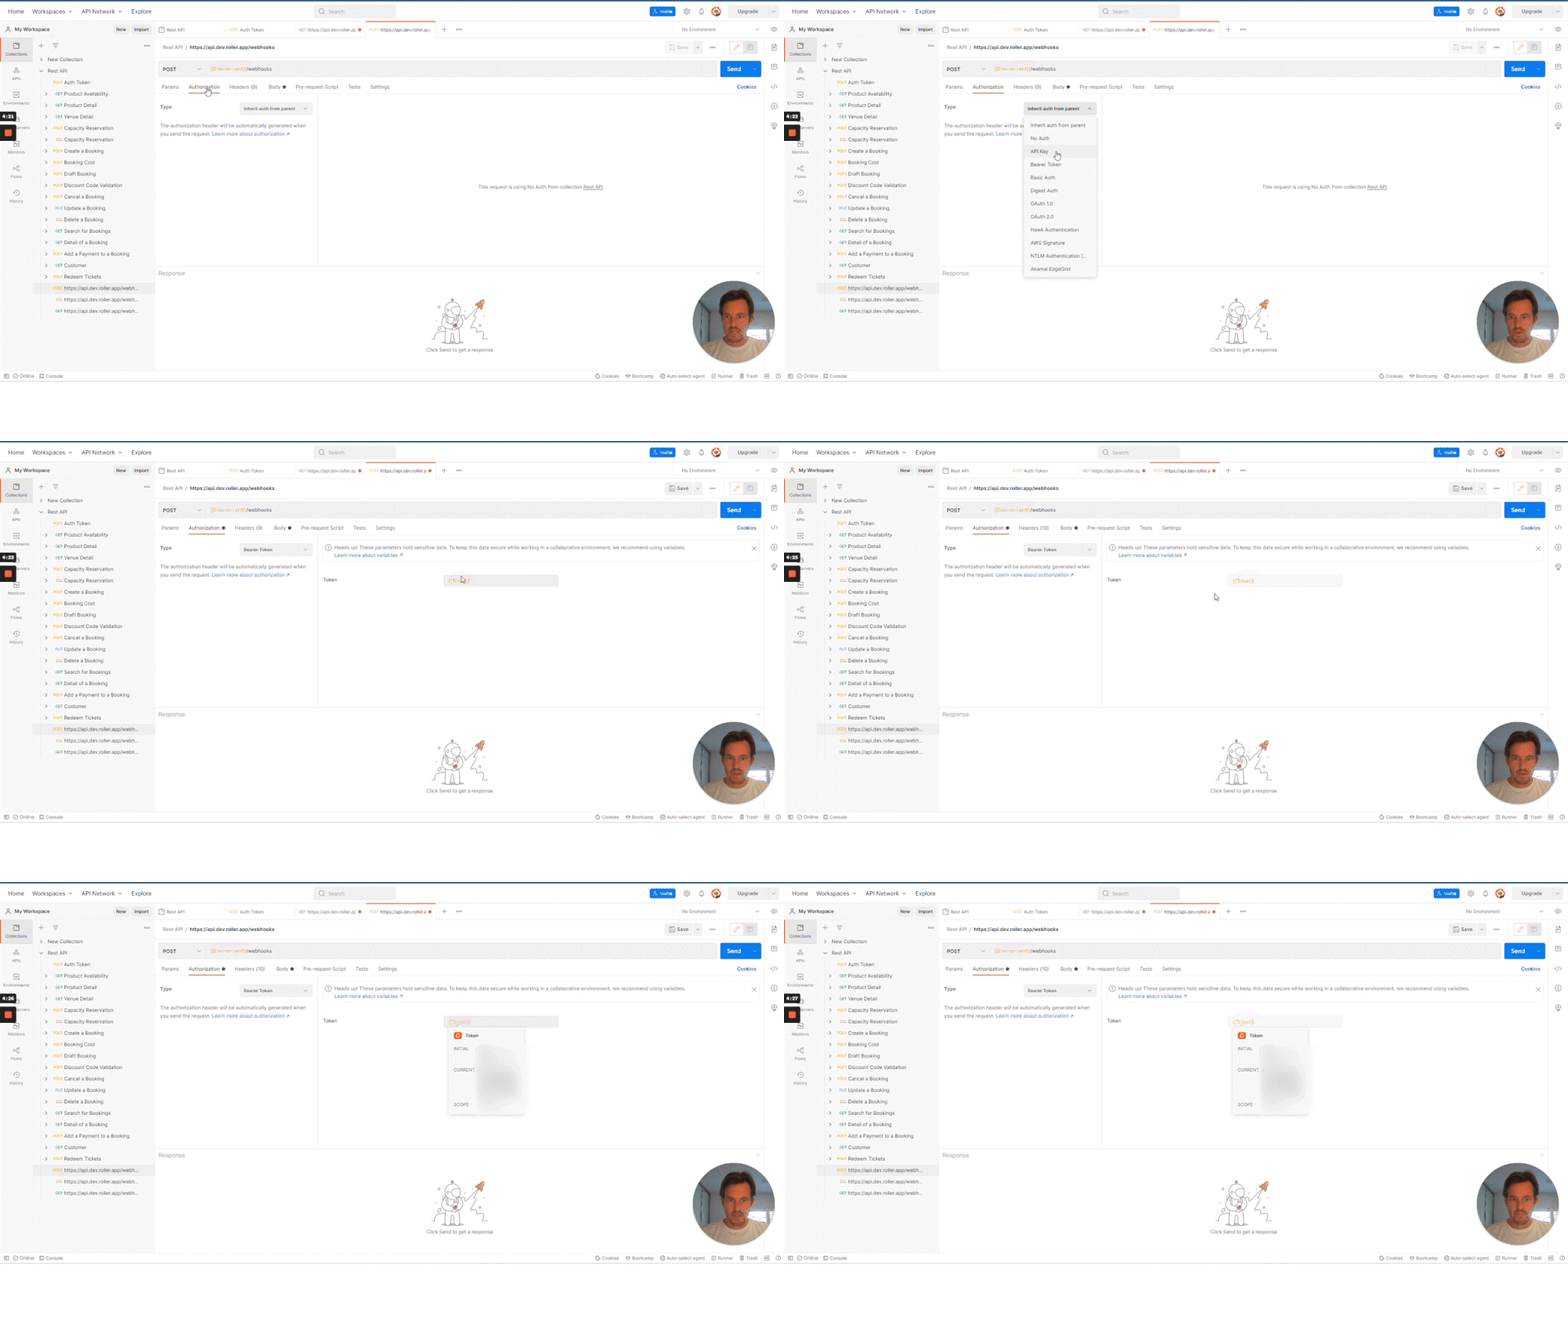
- Go to the three endpoints and see if you’ve already set up a webhook in ROLLER. Under ‘Authorisation’, click the ‘Inherit from parent’ tab and switch it to ‘Bearer Token’ because that’s what we’ll use. Starting with two curly brackets, choose the ‘Token’ variable that you just saved. Click ‘Send’ and you’ll get the webhook you already set up.
The complete guide to using Postman collection can be found here.
Step 3 : Webhook REST API Request and Authentication in Postman
- The API requests to create, view and manage webhooks need authentication through a Bearer token.
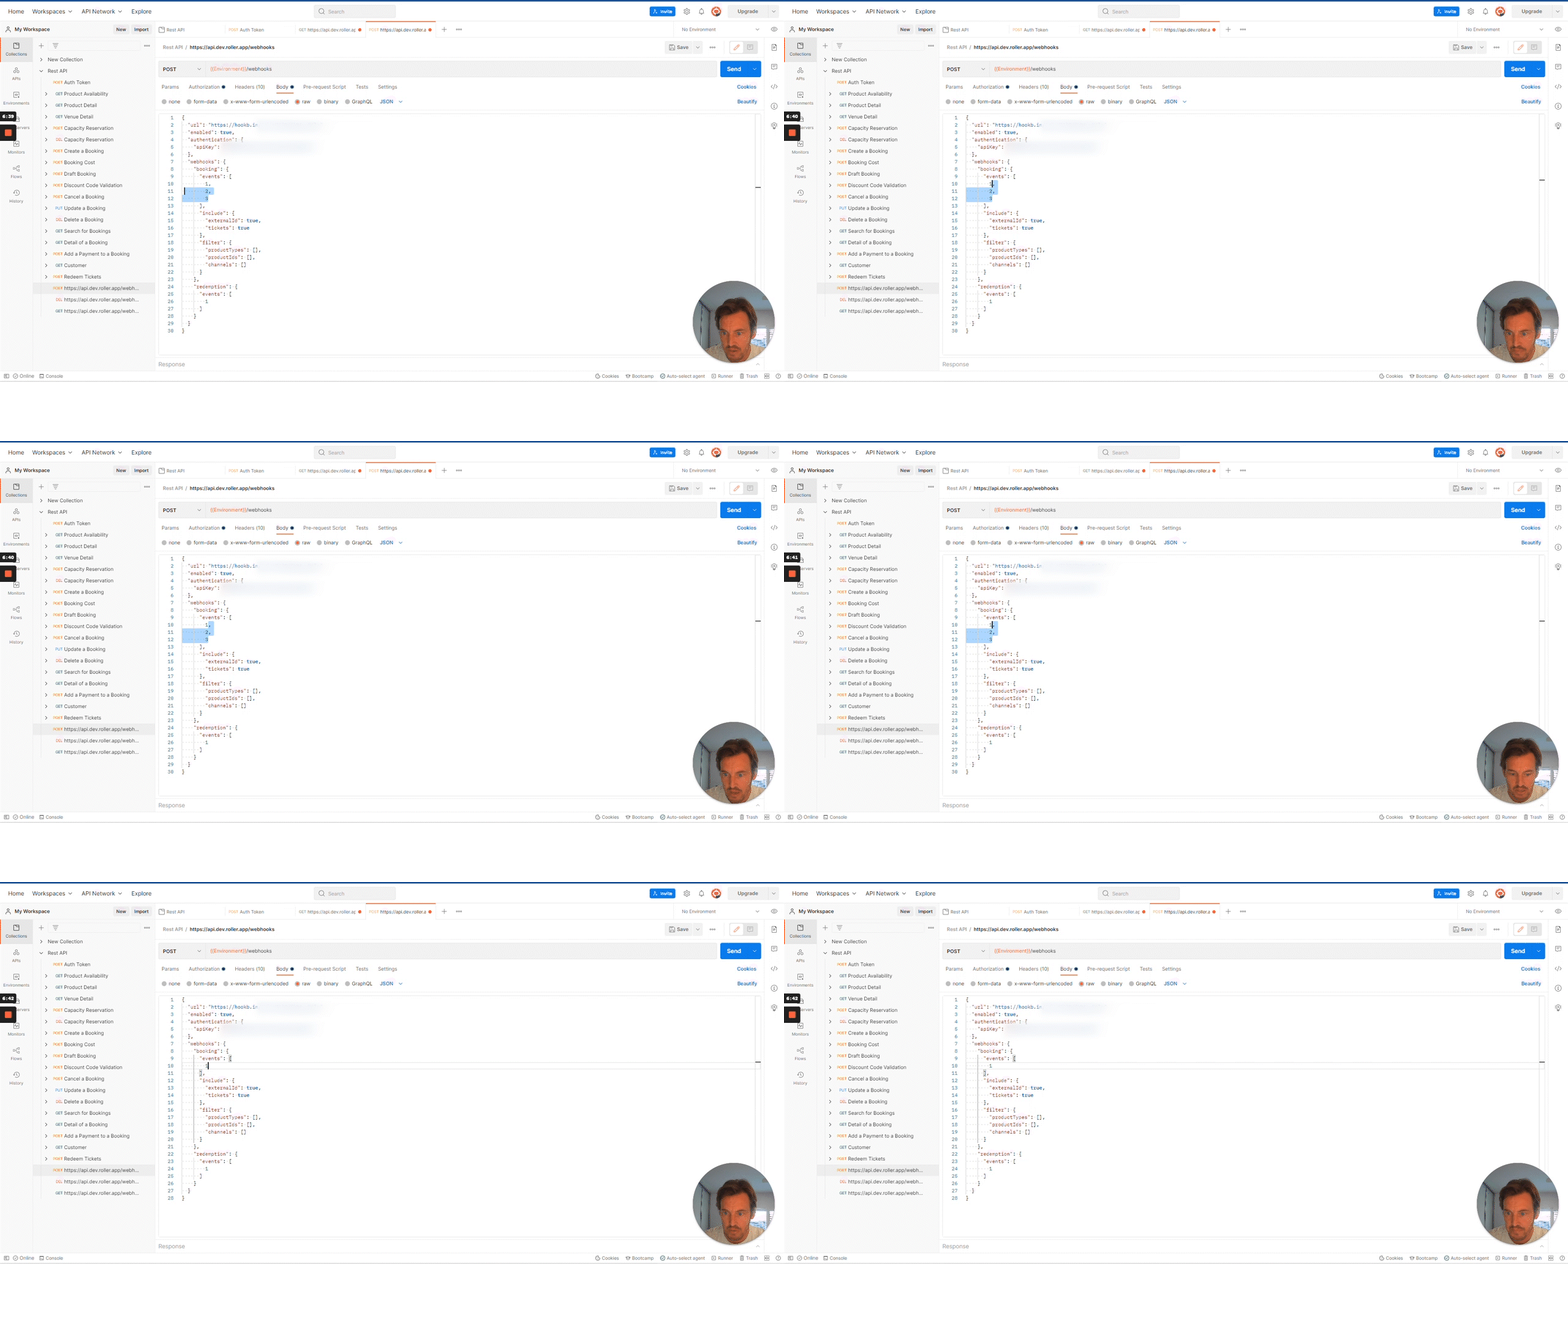
- After you have put in the access token, you can edit the body of the request:
- Remove the redemption object in the body of the ‘Create webhook’ request.
- Remove event 2 and 3 for the booking object (only event 1 is relevant here, which corresponds to a new booking purchase event).
- Use the ‘Channel 2’ filter for the checkout and remove redemption and events from the body. Copy your webhook URL from Zapier and insert into the body text.
- Press ‘Send’ on the API request. You should see the webhook ID and details in the response if the API request is successful.
Step 4 : Test the webhook in Zapier
- Go back to Zapier to test the webhook. After your webhook is created, it should be able to catch any booking responses.
- Select the response and continue to proceed with configuring the action of the ZAP workflow.
Step 5 : Configure Facebook Pixel Settings
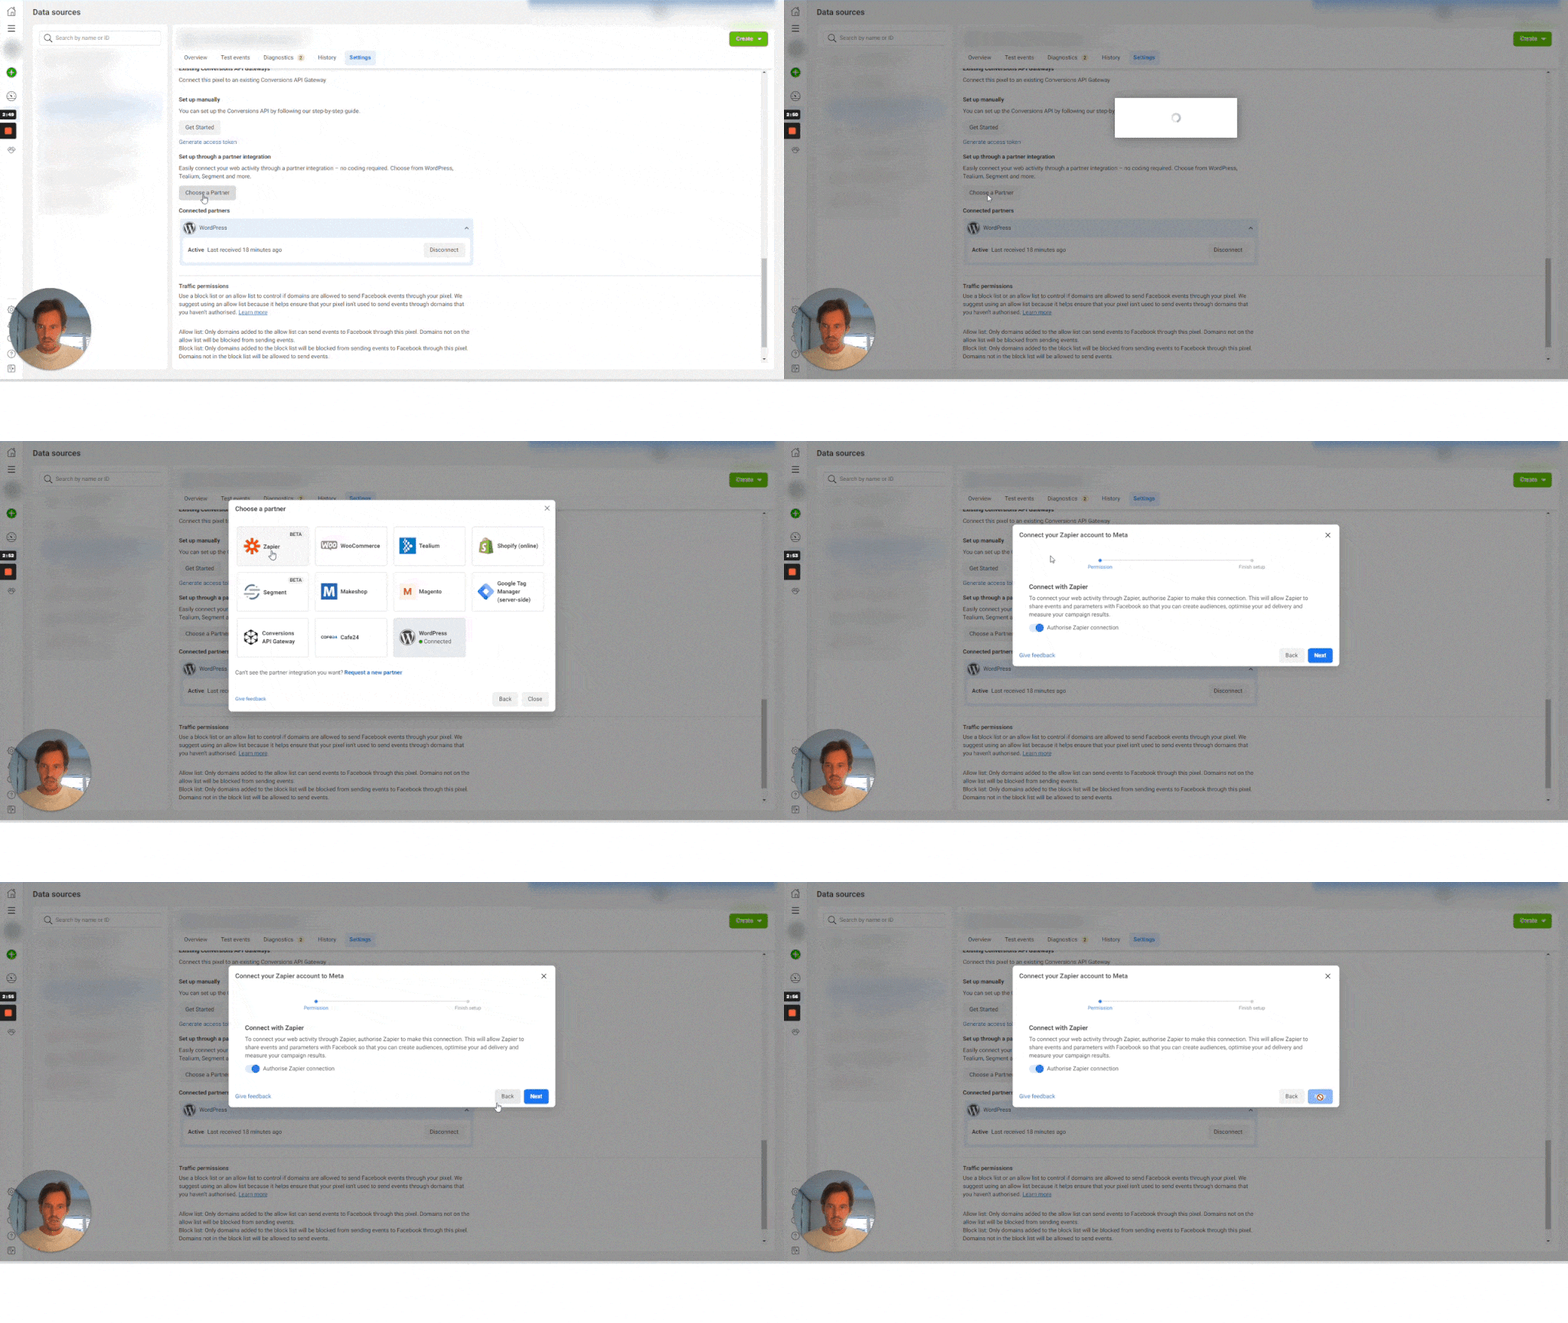
- Before you can proceed with the action, you need to configure the Facebook pixel that will receive the events. You can create a new pixel or use an existing pixel in the Facebook Event manager.
- Navigate to the settings of the Facebook pixel and select Zapier as an integration partner.
- Navigate to the ‘Test Events’ tab on the pixel, and note down the test event code that we’ll use later on ahead.
Step 6 : Configure the action on the ZAP in Zapier (and then Facebook)
- Choose the app to be ‘Facebook Conversions’ and the action event to be ‘Send Purchase Event’.
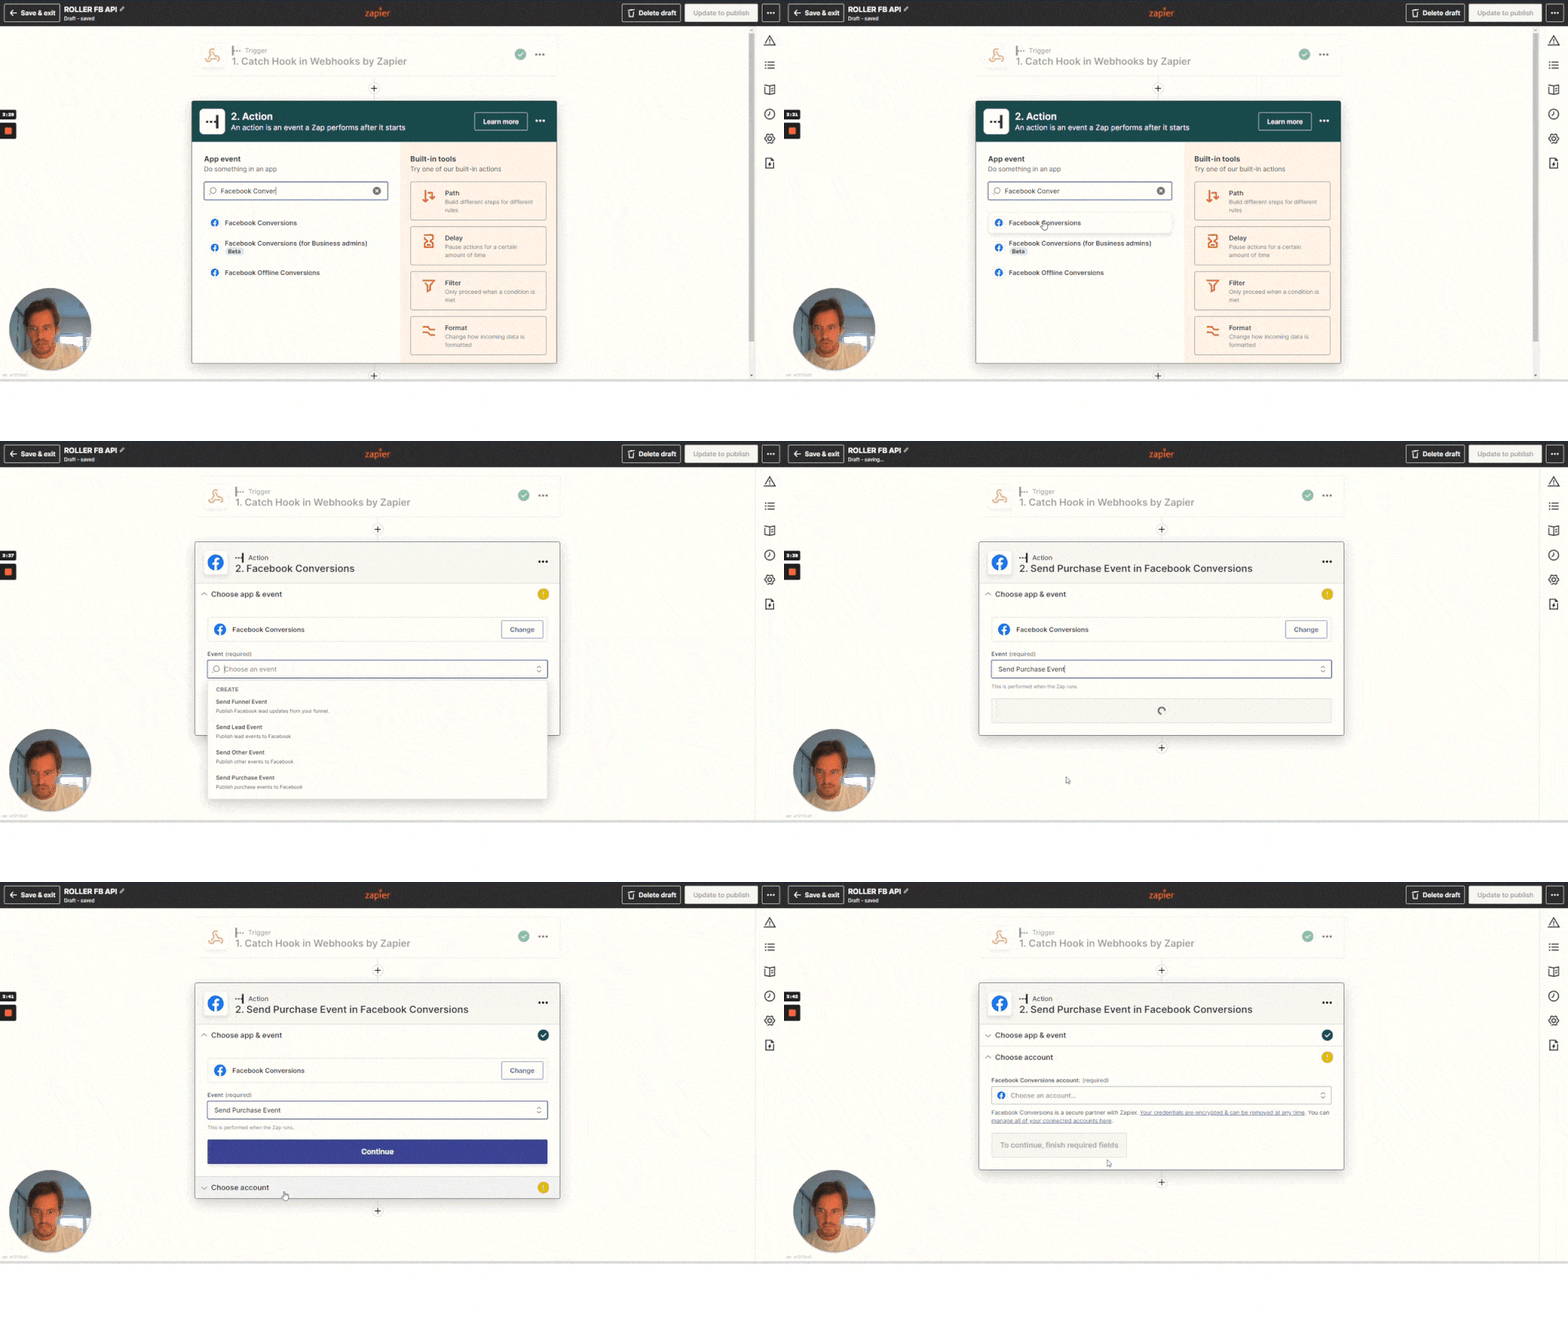
- You’ll be asked to log in to your Facebook account, which has access to your pixel.
- In the ‘Source and Destination’ tab, you’ll need to provide the action source as ‘Website’, and select the business account and pixel that will receive the event.
- In the ‘Event Info’ section, you’ll need to select Event ID and Event time from the test response you captured earlier. After you have done that, you also need to provide the test event code from step 5.
- In the ‘Customer Info’ section, you’ll need to provide at least one field from the list of predefined fields to proceed. Although we’ll create most of our fields in the custom field section ahead, we’ll just select the ‘first name’ and ‘last name’ of the customer from our test response.
- In the ‘Custom Fields’ section, you’ll need to select the field from the test response which corresponds to the value of the booking in the ‘Value’ field. Select ‘Data booking total’ and enter ‘+0.1’ to make sure that when the booking value is zero, this will still provide a value, and Zap won’t give an error. You’ll also need to select the currency.
- Click ‘Test and Continue’ and ‘Publish Zap’. Publish your Zap. It’s now working and any booking created online gets sent to Facebook with its value and customer name.
Facebook now matches it to its own database to improve the lookalike audiences you target your ads to. Now sit back and watch your cost per click go down.
Step 7 : Test the action
- After you finish configuring, you can test the action. You’ll receive the response that the test was successful and a purchase event was sent to Facebook Conversions.
- Now you can navigate to your Facebook pixel where you can see the purchase event.
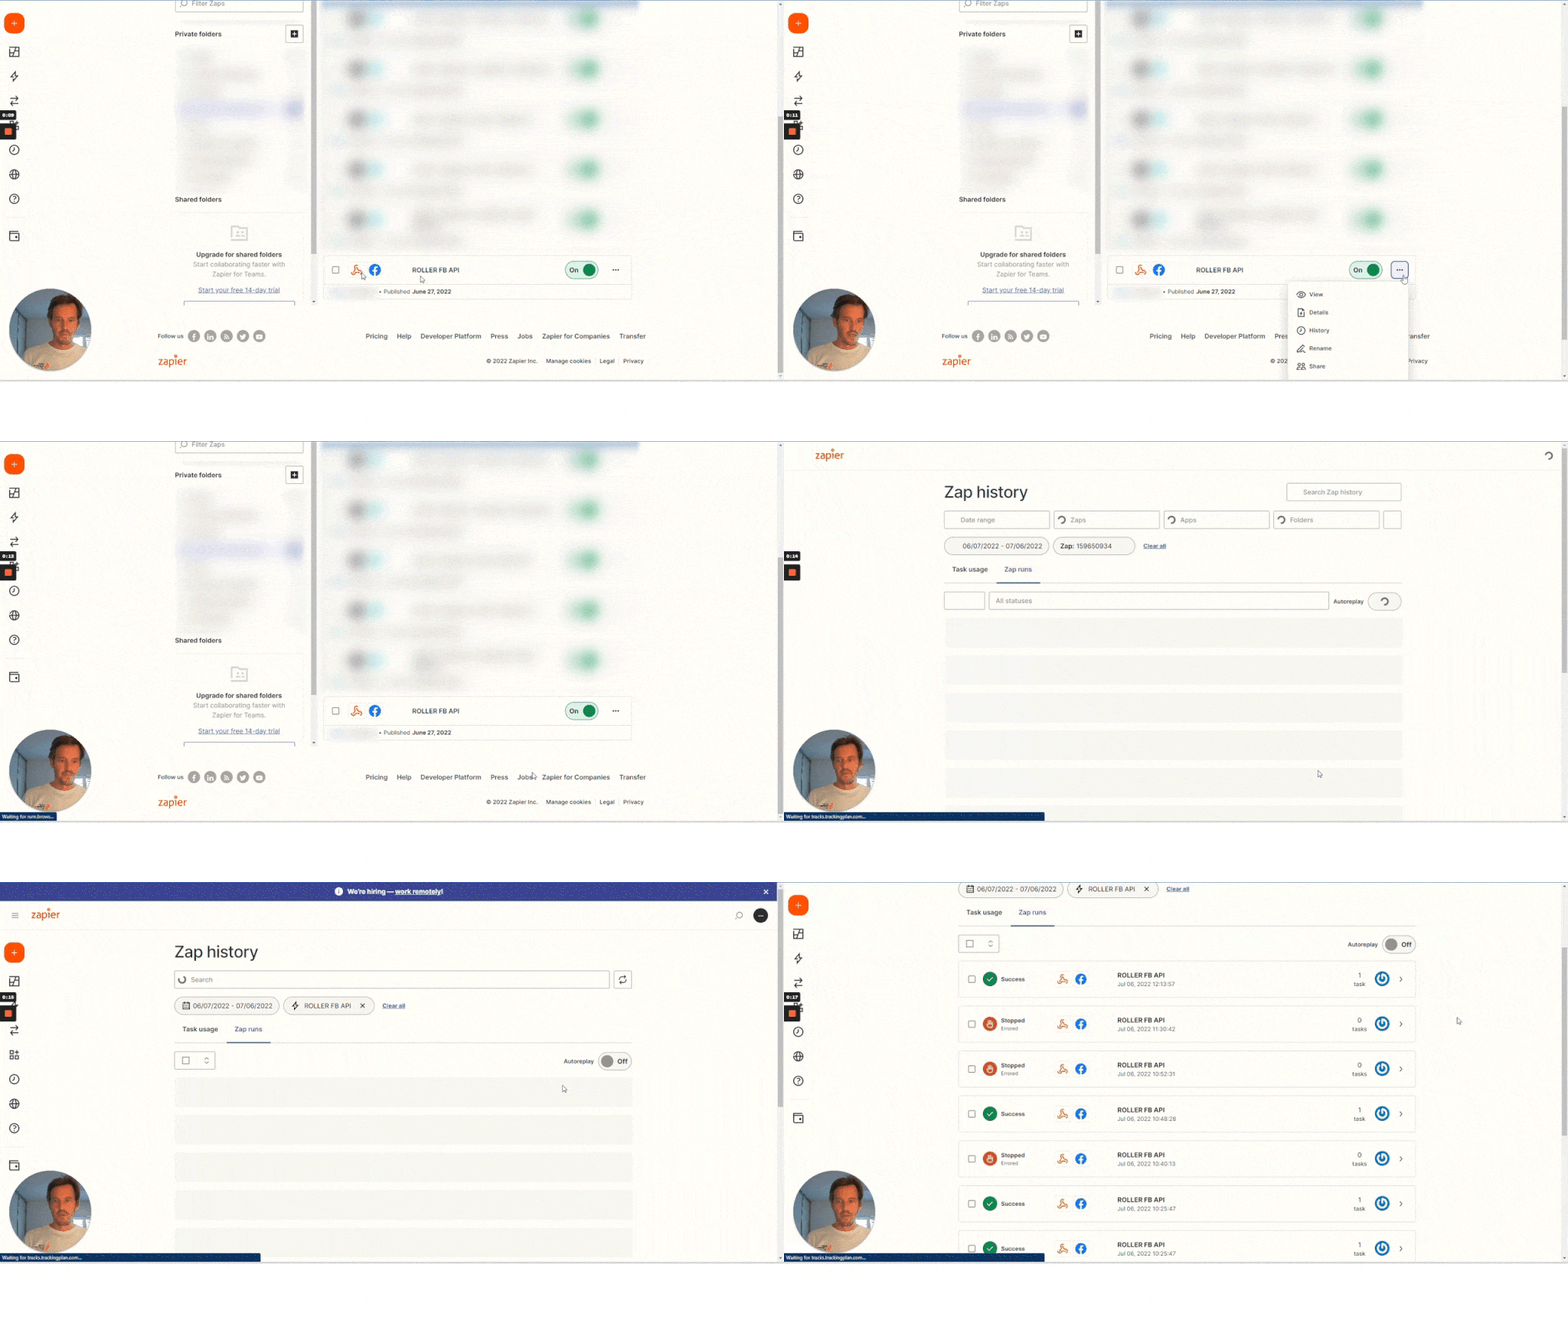
Step 8 : Turn on the ZAP
- After a successful test, you need to go back to the action in the ‘Event Info’ section and remove the test event code.
After removing the test event ZAP, you can turn on the ZAP and have your events delivered to Facebook Conversions in real time!
How to delete your webhook
The webhook takes up API calls from your 5k calls to the ROLLER API (if you are on tier 1). If you want to delete the webhook setup again in ROLLER, you can do the following:
- Use the final endpoint (the delete endpoint) and select your ‘Bearer Token’ and put that in ‘Token’ under ‘Authorisation’
- Enter the webhook ID into the webhook to be deleted back in the ‘Authorisation’ tab.
- Press ‘Send’
You’re ROLLER ready!
In this guide, we’ve used ROLLER webhooks to send purchase event data from your ROLLER bookings to the Facebook Conversions API without writing a single line of code.
Note: Some bookings don’t have a value (membership bookings, for example). These will give an error in your Zapier Zap. You can simply ignore this.
Need help? Drop us an email at jeroen@smartsegments.ai

